I think what most of you would like to hear is how you can get your ship flying again on the next morning for a competition day and this is what I would like to try to explain. It is surprising how much you can do if you know how to approach the problem. You have to assess different problems. You can do very much more if you sacrifice outward appearance and the, say, accuracy of a professional job at the repair shop. Obviously you have to obtain the original strength. So, in order to make a decision on whether you can fix something overnight, you've got to understand a few things. You have to understand some things about materials, some things about working procedures, some things at least about how a glider is built, and what sort of loads it is subjected to.
I'll give you a quick rundown on the materials most commonly used in all the German fiberglass gliders. All the resins used in these gliders are, of course, epoxys and they are produced by Shell. At the moment, there is no factory authorized equivalent in the United States. All the gliders use various combinations of the same two basic layers of glass cloth and they all use glass rovings. Most of the manufacturers use various core materials for the sandwich types--like in all wings and in some fuselages. Most of them use various ways of increasing the viscosity of the resins for making dry joints like gluing together the two halves of the fuselage or some such thing.
Now, some more details of the above mentioned materials. First of all--glass. There are two basic types of glass cloth. One type has almost equal strength along the weave and the warp; the other has almost no strength along one direction and all the strength in the other direction. This latter is commonly called the unidirectional cloth. Rovings--I think most of you have seen these. They are just unwoven strands of glass usually rolled up like string and this is this is also very much how they are used. They are capable of transferring loads only along the grain. Rovings, if they are saturated with resins, as they always are, can obviously also transfer loads in compression in the opposite direction. Most fittings are attached with rovings which transfer the loads from the fittings to such parts as the skin or other parts of the structure.
The glass used to produce these cloths and rovings is of high quality, and it has a special finish on it so it is definitely not advisable to just go down to the local boat shop and buy a bit of glass cloth and stick it on your glider for structural repairs. This is definitely out. I am not saying that you cannot buy equal glass here in the United States, but the chances are that you will not know what you are buying. There is one consolation in all this though, the glass which most of us are importing from Germany has extremely good handling qualities; and the cost, even after importing, isn't very high in relation to the labor cost. So there really isn't any great penalty.
Let us get back to the resins now. Obviously, as I said before, it is an epoxy and the name of it is Epikote 162, and the hardner is Laromin C260. As mentioned before, there are equally as good resins produced in the United States, but they are not authorized by the manufacturers and must not be used.
Once again--the handling qualities of these particular resins are extremely good. The low viscosity of them makes for good penetration of the glass cloth; the exothermic action is very low; you don't get a lot of gas problems as with some of the resins available in the United States.
As an aid in repairs, I also use polyester resins. They are never left in as a permanent structure. They may be left in as a backup piece just to hold the epoxy mixture in place when you first apply it and while it is still soft, but it can never be allowed to carry any load. It is just not capable of it. The bonding of the polyester resins to glass structures is very, very poor. The times whien I might use polyesters is when I put two halves of a broken fuselage together temporarily just to hold them in line; or I might use it to hold a backing piece in place to bridge a gap so that I can lay the glass on it, and things like this. So, once again, polyesters must not be used for structural repairs at all.
The most commonly used resin fillers are chopped cotton and microballoons. Cabosil is used to thicken polyester resins. These thickened resins are used for dry joints as I explained before. The Aerosil also has a very handy application in making puttys out of jel coat to fix small nicks and bings on you glider's surface. Gel coat thickened with Aerosil can be sanded off later and looks quite adequately white so you do not have to necessarily paint over it.
The last group of materials are the core materials used for the construction of sandwich type structures. There is balsa, foam, and honeycomb. They all have got various advantages and disadvantages and it is mostly the choice of the manufacturer as to what he likes best. They can, more or less, readily be exchanged in repair without any detrimental effect.
Also, sometimes microballoons and styrofoam pellets are mixed together and used for core material in small areas, but they are relatively heavy.
After you have had an accident, I think there are a few things which you should do in more or less the order I am going to give you. This will probably give you the best chance to get the ship flying by the next morning.
Obviously you inspect for the obvious damage first. Just have a look to see if there are two wings someplace. After you have ascertained the obvious damage, it is a good idea to try to reconstruct in your own mind how the accident happened. You know yourself that it is quite easy to get confused as to jest what happened, but try to do the best that you can. Now that you think that you know what happened, have another look at the ship in the areas that you might not have looked at before. Quite often you pick up damage you never even thought would be there.
Before you de-rig, if that hasn't been done in the accident, check your control movements and check whether things are still working or not. You might have popped loose an aileron bell crank or some other attachment someplace. It might not be possible to gee this from the outside. Or you might have missed it on the inspection. So make sure everything is still working the way it should.
When you de-rig, take a special notice of all the pins and other things having to do with de-rigging are still coming out with the normal amount of grappling, and no more. That will give you a fair idea on how things are in this area. If you have decided that there is a chance that you can repair the damage by the next morning, I think it is a good idea at this stage to make some arrangements ahead. Make arrangements to get a work cleaned and a little bit of heat into it and a few saw horses ready and odds and ends like this. If you save an hour by doing this, this is one hour you are ahead tomorrow morning. It can mean an extra hour curing time and curing time, you will find, is one of the major limitations in getting the repairs done.
To have adequate strength in a repair you need approximately these times: eight hours at 25 C.; four hours at 35 C.; and two hours at 45 C. These times are approximate and you usually cannot apply heat until after the resin has jelled to some degree or else you will get some gas development lifting the glass cloths of the repair area.
The best inspection will not help if you do not know what you are looking for. Glass structures usually fail in compression and a compression break similar as in wood is visible by the fact that the resin discolors towards white. Flecks in the gel coat are a good indication that this area of your glider was overstressed or at least stressed. Always have a good careful look in those areas. Putting a source of light inside the fuselage or the wing, for instance, will sometimes show up cracks. They appear as darker lines on the outside. You probably also find a lot of hairline cracks mean damaged areas. Most of the time I have found that under those there is no serious damage but that doesn't mean that you should just disregard them. Definitely check further, as I mentioned before.
If you have always made a proper daily inspection on your glider, you probably get to know some of these hairline cracks that sometimes get there from ordinary flying or mishandling while rigging or de-rigging. If you recognize some of these you don't have to worry about them. So that is a very good reason to do a proper daily inspection.
Areas that you always have to inspect are those around fittings. It is sometimes very hard to see damage near the fittings. There are corners, overlapping layers of glass and this can get very confusing. So take a very good look at those areas just to make sure everything is OK. Check all bell cranks if at all possible. Check all push rods and connections. Check everything--whether you think there shouldn't have been damage or not. The most important fact on an overnight repair is: get the final layers of glass on just as soon as possible.
It is usually appears most difficult to bridge holes in the structure. Such holes can usually be filled up with styrofoam, balsa, or anything at all--just use the imagination. Just bridge them so that you can lay the final glass over them. You can always do the repair again after the meet to get all the rubbish back out again.
After you get organized for the glass repairs, there is usually plenty of time to worry about the metal parts; or better still, get somebody else to do that for you.
I would like to give you some very general ideas on what you can fix overnight and what there is very little chance of fixing. It saves a lot of frustration. You might as well go to bed if you can't fix it--or have a couple of beers. It depends to a large extent, of course, on your own or your helper's ability and experience on how much you can do. If you have no experience in glass repair obviously you can do very little. If you have a lot of experience, even in associated kinds of repairs like wood, it helps a great deal. It also depends on what sort of aids and what sort of tools you have available. If you have to do all the scarfing with a little bit of sandpaper and by hand, you are still boing to be sanding and scarfing next week. This is obviously no good. So have some tools readily available for this sort of thing. A quarter-inch drill with some good quality and coarse sanding disks will do amazingly much. It always depends upon how many curing cycles you have to go through.
Sometimes it is not possible to get the final glass on before you do some other repairs in the area. You might have two or sometimes more cycles to go through. If you allow about four hours for each cycle and about six hours after the last one, it is quite easy to calculate how much you can do.
Obviously the application of heat helps the curing cycle. But heat must be applied carefully. Lamps are generally the most difficult to control. They tend to put hot spots in one area and leave the rest cold or cool. Hot air blowers are definitely the most successful. Do not heat above 45 C. You will burn the resin. The core materials, it is foam or honeycomb, can also be affected by heat so there is only so much you can do about heating up the repair area.
Damage that you can most easily fix is holes in any part of the glider which are small enough not to have affected any of the alignment. You can usually fix minor damage to fittings and attachments. You can usually completely replace simply mounted fittings, say, the forward fitting on the Libelle elevator or similar things. These types of repairs are quite easily done overnight.
There are a few things which are pretty marginal to do in one night. One of them is, unfortunately, the most common of all damages--the broken fuselage. I think everybody knows it has been done and can be done overnight. But everything has to be working pretty well for you and you can definitely not do it if haven't done it before. However, if you can get help and expert advice you can, with a little bit of luck stick that thing together and fly it again on the next day.
Pretty marginal is damage to the primary fittings. If you have a minimum of lining up to do, it might be possible. Almost impossible to fix is major damage to fittings--broken up sections of the wing or completely demolished tail surfaces, ailerons, or things like this. They get pretty difficult and involved to fix overnight.
Practically all repairs need the splicing in of new glass in some way or another, and I would like to give you a few words on how to do this. As a, general rule, each layer of glass requires about an inch of splice length. This is probably a little more than is actually necessary for the strength but it gives you a little bit of margin for inaccuracies. You've got to replace the missing glass with at least the same amount of glass and most important, you've got to place it in the same direction as before. Sometimes you can substitute other types of glass just as long as you have the same amount of fibers running in the right directions just like they were before. You have to carefully count the layers of glass and inspect the direction of the glass fibers before you can know that. This can be done quite easily. Apply a flame to a broken out piece and the resin will slowly burn out. You will then have left in your hand several easily countable layers of glass. You can then see the type of glass and in which direction it was applied on the original surface.
The splicing is a matter of practice. I usually start with a fairly big grinder and finish off the edges by hand. The edges are very important. You must obviously not sand through any glass on the outside of the scarf.
Just sand through the gel coat but not through the glass. It is usually just possible to see all layers of glass in the scarfed area, but this also takes some practice.
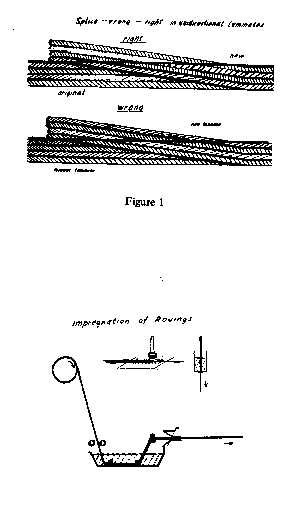
Very important, now, is the way you lay the new glass into the scarfed area. You put back the outermost layer first, then the second, third, and fourth, and the innermost layer last of all. If you look at the following figures you can see the reason why.
The foregoing was just a few hints and warnings about fiberglass repairs. Don't think of it as a complete textbook thereof.
Question: (Rob Buck) Why do they use fine cloth instead of thick cloth sometimes?
Answer: The fine glass is generally used on the outside because of the easier finishing thereof.
Question: (Ed Replogle) Are the resins toxic?
Answer: I believe that the resins are not very toxic at all. The hardners however, are aromatic amines and they can be absorbed through the skin and I believe one can get allergic to them. Use them with caution.
Question: (A. J. Smith) Is the scarf joint as strong as the original piece?
Answer: Yes. It is at least as strong and usually pieces of some extra material used will actually make it a little bit stronger. It will, therefore, be stiffer and a similar load in the future will usually cause a break in an adjoining area but not in the same place.
Question: How do you know that you have a really good bond between the new and old surfaces.
Answer: This is just a matter of good workmanship. You know that if you do the proper sanding and keep it nice and clean that the adhesion will be O.K.
Question: (Gren Seibels) Do you ever clean the surface with any fluids or anything before you do any epoxy work?
Answer: Yes and no. I do not use any solvents, water, or anything else before starting the epoxy work. I do, however, go over it again with sandpaper just to make sure that nobody has left his fingerprints on it.